From this article You will learn about:
- One-click Azure AD SSO login for combination: Angular + .Net core,
- Authenticate & receive JWT tokens from Angular perspective,
- Resolve & recognize the user by JWT token & Microsoft Graph.
Prerequisites
- Azure Active Directory,
- Registred application in AD.
Introduce
This article contains information about using Azure Active Directory credentials for login to Angular client-side with .Net core backend. This solution is constructed using JWT tokens (frontend and backend solutions can be on different hosts, so cookies auth methods by CORS policy is not the best choice in that case). The below diagram shows the way components communicate.
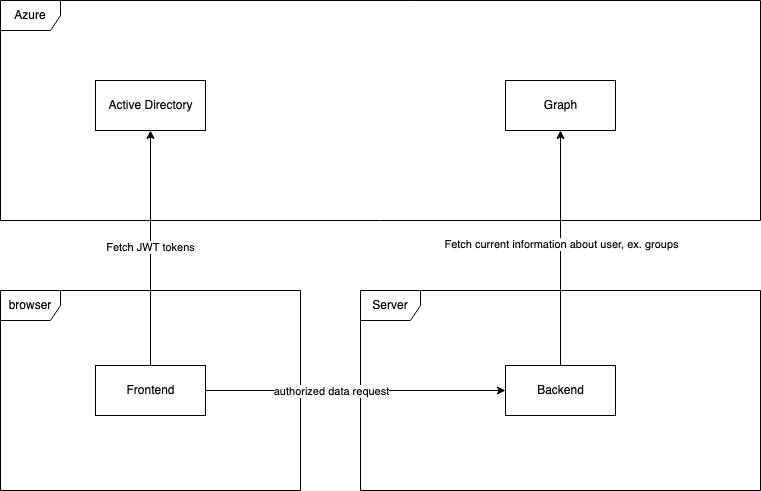
How it work?
- User click on the login button at frontend, browser level,
- Frontend redirects the user to the Azure SSO login page,
- User fill login form with email & password, then accept some app rules,
- Azure redirects the user back to the frontend app with filled-in some special params in URI.
- Msal library by URI params fetch JWT token and save it into chosen persistence layer (local storage or session storage, it can be configured),
- Frontend component try to fetch restricted data from backend,
- Msal interceptor check current JWT token, if it’s correct then put it to Authorization header, else refresh it and put it (additional implementation of token refresh is not needed),
- Backend by correct audit validate JWT token and resolve from it claims, token can be also cached (for better performance),
- When the resource is restricted to a special group, backend call to Azure Graph for the user group and can validate it at the application layer.
Benefits of using it in that form
- One place of user credentials,
- Backend is testable (graph library & httpContextAccesor can be mocked),
- Cors policy is restricted,
- User information is available from a backend perspective,
- Token refresh solution onboard.
Implementation
Frontend side – Angular
Angular solution is constructed on library MSAL. It can be installed by NPM command:
npm i @azure/msal-angularAfter correct installation, next step is configure library at root app.module.ts level.
const isIE =
  window.navigator.userAgent.indexOf('MSIE ') > -1 ||
  window.navigator.userAgent.indexOf('Trident/') > -1;

@NgModule({
  declarations: [AppComponent],
  imports: [
    BrowserModule,
    MsalModule.forRoot(
      {
        auth: {
          clientId: environment.clientId,
          authority:
            'https://login.microsoftonline.com/' + environment.tenantId,
          redirectUri: environment.frontend,
        },
        cache: {
          cacheLocation: 'localStorage',
          storeAuthStateInCookie: true,
        },
      },
      {
        popUp: !isIE,
        consentScopes: ['user.read', 'openid', 'profile', 'user.groups'],
        unprotectedResources: ['assets'],
        protectedResourceMap: [
          [
            environment.api,
            ['api://' + environment.clientId + '/user_impersonation'],
          ],
        ],
        extraQueryParameters: {},
      }
    ),
  ],
  providers: [
    {
      provide: HTTP_INTERCEPTORS,
      useClass: MsalInterceptor,
      multi: true,
    },
  ],
  bootstrap: [AppComponent],
})
export class AppModule {}
Explains:
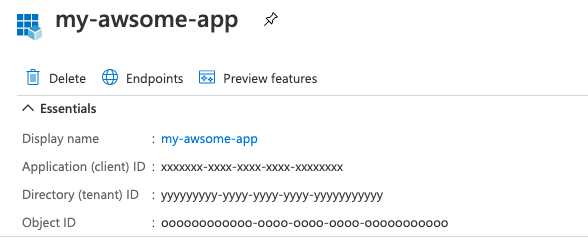
- auth.clientId – app azure AD registered client id. It should be equal to azure property Application (client) ID,
- auth.authority – app authorization, for most cases https://login.microsoftonline.com/ + tenant id (Directory (tenant) ID),
- cache.cacheLocation – persistence for token (localStorage | sessionStorage),
- consentScopes – app permissions,
- unprotected resources – unprotected resources,
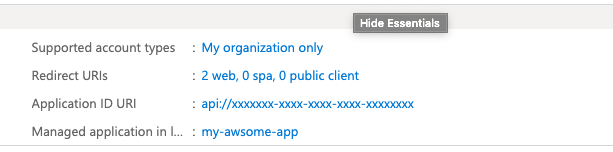
- protectedResourceMap – dictionary (or map) permitted resources, in this case, it will be the address of .Net core backend, with correct scope. The prefix of this scope must be equal to Azure field Application ID URI
- providers – register of MsalInterceptor.
Next step is consume invoke auth method by login method.
export class AuthenticationService {
constructor(
private _msalService: MsalService
) {}
login() {
this._msalService.loginRedirect();
}
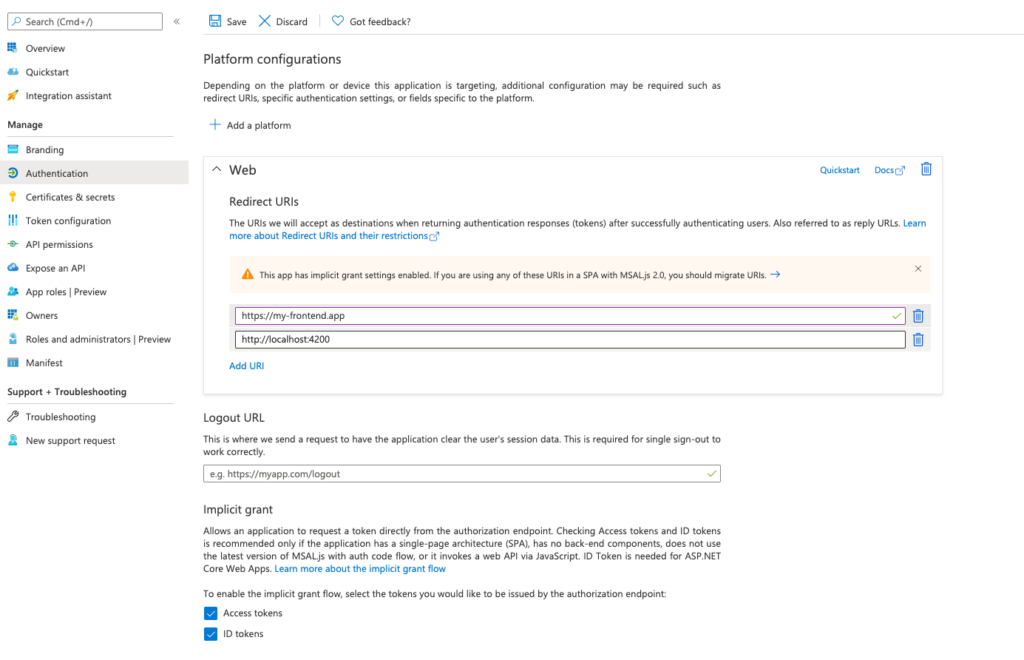
}The last step to finish frontend implementation is proper Azure redirect configuration & select options:
– Access tokens,
– Id tokens.
Redirect URIs must be the same as the frontend address. For debug, case good habit is set http://localhost:4200 obviously only for DEV environment 🙂
Server side – .Net core.
.Net core server solutions need to fetch packages like:
Microsoft.Identity.Web
Microsoft.Identity.Web.MicrosoftGraph
Microsoft.Graph
Microsoft.AspNetCore.Authentication.OpenIdConnect
Microsoft.AspNetCore.Authentication.JwtBearer
After the installation of upper packages, the next step is to fill of IConfiguration interface, in this case, settings will be kept in appsettings.json file.
  "AD": {
    "ClientId": "xxxxxxx-xxxx-xxxx-xxxx-xxxxxxxx",
    "TenantId": "yyyyyyyyy-yyyy-yyyy-yyyy-yyyyyyyyyyy",
    "Instance": "https://login.microsoftonline.com/",
    "ClientSecret": "secret"
  },
  "DownstreamAPI": {
    "BaseUrl": "https://graph.microsoft.com/v1.0",
    "Scopes": "user.read"
}- Ad.ClientId like in frontend should be equal to Application (client) ID,
- Ad.TenantId again, like in frontend, should be equal to Directory (tenant) ID,
- Instance like in frontend authority case, most cases https://login.microsoftonline.com/
- ClientSecret – secret generate in Azure portal (next step),
- DownstreamAPI – most cases will be like here :-).
After filling in the configuration, the next step is to bind it to library properties. Responsible for that are below extension methods.
public void ConfigureServices(IServiceCollection services)
{
services.AddMicrosoftIdentityWebApiAuthentication(_configuration, "AzureAD")
.EnableTokenAcquisitionToCallDownstreamApi()
.AddMicrosoftGraph(_configuration.GetSection("DownstreamAP"))
.AddInMemoryTokenCaches();
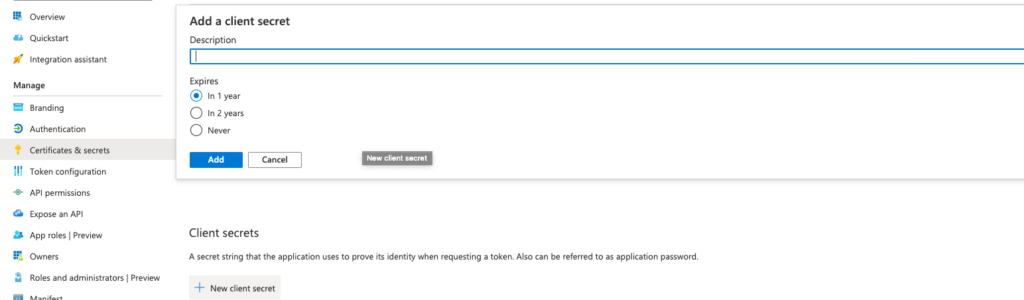
}Client secret should be generate in certificates & secrets section. Value of it should be moved to appsettings.json configuration.
All things are almost done, the authentication process should work correctly. The last step is to get details information about the logged user at the backend Application layer. It can be done by graphServiceCient:
private readonly IGraphServiceClient _graphServiceClient;
public UserPermissionsAzureGraphRepository(
IGraphServiceClient graphServiceClient)
{
_graphServiceClient = graphServiceClient;
}
private async Task<ICollection<string>> FetchGroupsAsync()
{
var adGroupsPaged = await _graphServiceClient
.Me
.GetMemberGroups(securityEnabledOnly: true)
.Request()
.PostAsync();
var adGroups = await FetchAllAzureGroupsAsync(adGroupsPaged);
return adGroups;
}
// Groups are paginated
private static async Task<ICollection<string>> FetchAllAzureGroupsAsync(
IDirectoryObjectGetMemberGroupsCollectionPage adGroupsPaged)
{
var adGroups = new List<string>();
do
{
adGroups.AddRange(adGroupsPaged.CurrentPage);
adGroupsPaged = adGroupsPaged.NextPageRequest != null
? await adGroupsPaged.NextPageRequest.PostAsync()
: null;
} while (adGroupsPaged != null);
return adGroups;
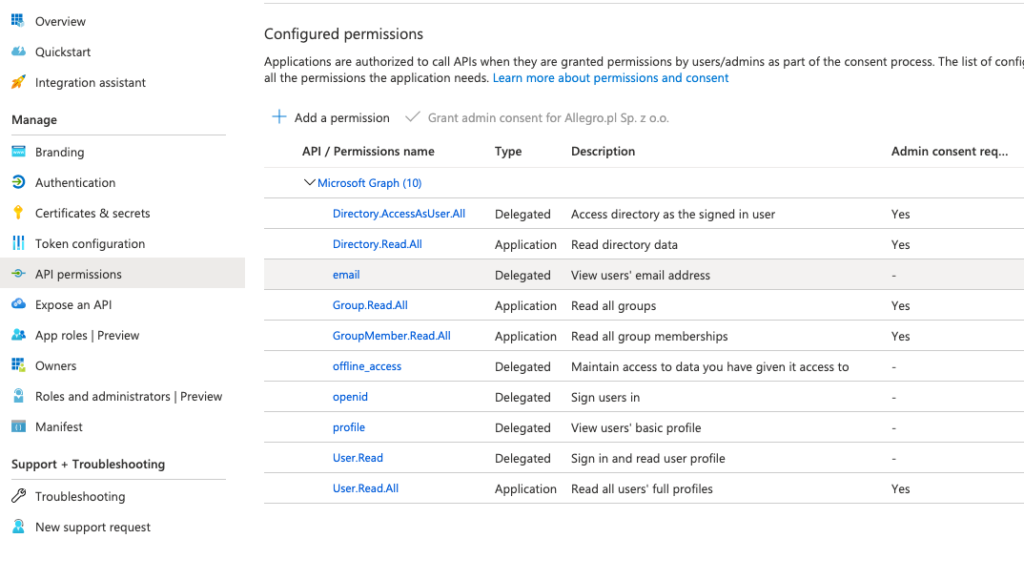
}GraphClientService for fetching this kind of data should have additional permissions at Azure Active Directory level, in the Api Permissions section:
Done, authentication is completed :-).
Why data like groups should be fetched by the graph, not by claims?
1. Is more secure way, JWT can be stolen & decoded,
2. Performance, when the count of groups will be huge, requests can be a little bit heavy, because of count claims. Btw. Microsoft cut off groups count in claims to 6 (source).
Thanks for reading, if You have some questions | suggestions I’m on Your disposition :-)!